

Introduction
Setting up a cupping lab is one of the most important steps a coffee business can take to ensure consistent quality, evaluate green and roasted beans, and develop new flavor profiles. Whether you're a roaster, exporter, importer, Q Grader, or specialty café operator, a well-designed cupping lab setup is where true coffee evaluation begins.
At Coffee Pro Direct, we help coffee professionals around the world design and equip state-of-the-art cupping labs that meet SCA standards and align with the growing demands of the specialty coffee industry. In this complete guide, you’ll learn what equipment you need, how to design your space, and what to consider for both functionality and professionalism.
Why Setting Up a Cupping Lab Is Essential in the Coffee Industry
Coffee cupping is the standardized method of evaluating a coffee’s quality, flavor, aroma, body, acidity, and defects. It is a cornerstone practice used by:
-
Roasteries developing roast profiles
-
Coffee buyers comparing samples
-
Exporters grading green beans
-
Q Graders conducting professional assessments
-
Cafés designing blends and menus
A cupping lab setup ensures that these evaluations are done consistently, scientifically, and in an environment that enhances rather than distorts sensory perception.
When done right, a cupping lab elevates your brand’s credibility and ensures that every cup you serve or sell is the best representation of your coffee.
What Makes a Good Cupping Lab? Key Principles to Follow
Before buying equipment or rearranging your workspace, it’s important to understand what makes a cupping lab effective. The best labs share these qualities:
Consistency
A good cupping lab is designed for repeatability. Every tool, surface, and condition should contribute to replicable results across different coffee samples and sessions.
Cleanliness
Sanitation is critical. Even a faint odor or dirty spoon can ruin sensory accuracy. Cupping labs must be spotless and free from distracting smells or contaminants.
Neutral Environment
Walls should be white or neutral in color, lighting should be even and natural, and all noise or distractions should be minimized.
Accessibility
The layout should allow for easy movement between stations, sample organization, and workflow efficiency.
Step-by-Step Guide to Creating Your Cupping Lab Setup
Let’s dive into how you can create a professional-grade cupping lab setup from scratch.
Define Your Lab’s Purpose and Scope
Are you cupping for internal QC? Green grading? Hosting buyer tastings? The purpose defines the space and tools you’ll need. A small specialty roaster will need a different setup than a national importer or SCA training facility.
Choose the Right Space
Pick a quiet room with good airflow, access to water and electricity, and minimal outside odor. Windows for natural light are ideal, but artificial lighting should be uniform and adjustable.
Plan the Layout
-
Install a U-shaped or circular cupping table for easy access
-
Designate stations for grinding, weighing, brewing, and scoring
-
Reserve a clean zone for spoons, cups, and rinsing
-
Use shelving or labeled trays to organize coffee samples
Install Key Equipment
We’ll detail the necessary cupping equipment below.
Essential Equipment for a Functional Cupping Lab Setup
Your cupping lab should include the following tools, all of which are available from Coffee Pro Direct:
Cupping Bowls
Ceramic or glass bowls with a 200ml capacity are the standard. Uniform shape and color allow for even comparisons.
Cupping Spoons
Rounded, stainless steel spoons with deep bowls allow for proper slurping, enhancing aroma detection.
Coffee Sample Trays
Color-coded or labeled trays help keep different origins and roast profiles organized during a session.
Precision Scales
A lab-grade scale accurate to 0.1g ensures every dose is exact, contributing to cupping consistency.
Kettles (Preferably Gooseneck)
Gooseneck kettles give you precise water flow. Electric kettles with temperature control are ideal.
Thermometer
Keep water between 92–96°C for brewing consistency. A digital thermometer provides real-time accuracy.
Timer
A standard timer keeps track of brew time, especially during crust breaking and cooling.
Grinder
Use a burr grinder calibrated for medium-coarse grind. Clean between samples to avoid cross-contamination.
Rinse Bowls and Spittoons
Rinse spoons between each sample, and offer a sanitary space for tasters to spit out coffee after evaluation.
Cupping Forms
Print SCA standard cupping forms or customize your own score sheets based on the attributes you value.
Additional Cupping Lab Tools That Add Value
-
Color Analysis Tools (Agtron meter or roast color reader)
-
Moisture Meter (for green or roasted beans)
-
Refractometer or TDS Meter
-
Sample Roasters
-
Customizable Labeling Systems
-
Storage Jars or Vacuum Containers
Coffee Pro Direct provides all these tools and more, in individual or complete packages depending on your lab’s needs.
Design Tips to Improve Your Cupping Lab Efficiency
Even the best equipment won’t help if your lab isn’t designed for ease of use. Here are layout and design tips from cupping professionals:
Use Neutral Colors
White walls and neutral surfaces reduce visual distractions and help in roast color assessments.
Control Light and Noise
Install soft lighting, avoid noisy machines, and keep the area quiet to support concentration.
Provide Space
Leave ample room between bowls so tasters can move freely without bumping into each other or contaminating samples.
Label Everything
Use clear signage or color-coded systems to avoid mistakes when tasting multiple samples.
Use Anti-Slip Mats
Keep bowls and tools secure on the table during wet sessions.
Training Your Team for Cupping Success
Even the best setup can’t compensate for poor technique. Make sure your team:
-
Understands the SCA cupping protocol
-
Knows how to use each tool correctly
-
Follows hygiene and rinse procedures
-
Practices note-taking and flavor vocabulary
-
Calibrates with Q Graders or expert tasters
Coffee Pro Direct also offers educational support with videos, training manuals, and remote consultations.
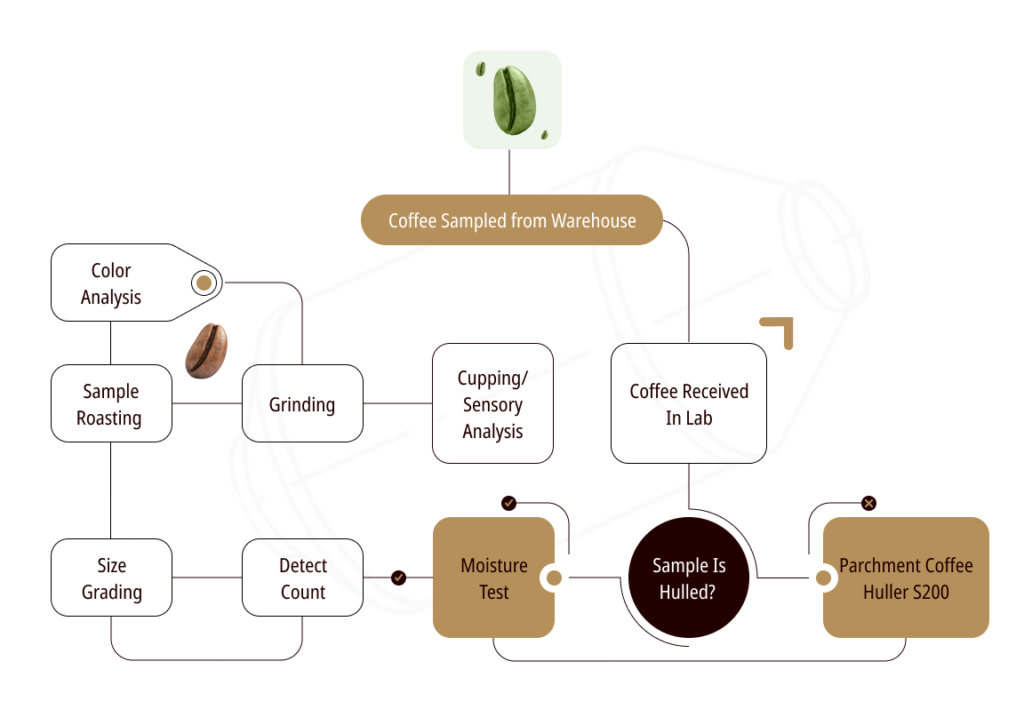
Cupping Lab Setup for Green Coffee Evaluation
Green bean grading requires extra steps, including:
-
Moisture content testing
-
Density analysis
-
Screen size separation
-
Visual defect analysis
For these tasks, tools like sieves, defect boards, and moisture meters are key additions to your lab.
Where We're Located: Coffee Pro Direct's Headquarters
21st Floor, CMA Building 64 Connaught Road Central, Hong Kong From this central global location, Coffee Pro Direct ships professional coffee equipment and lab tools to clients in over 50 countries. Whether you're in Singapore, Berlin, New York, or Nairobi, our team is ready to help you set up or upgrade your cupping lab.
Why Choose Coffee Pro Direct for Your Cupping Lab Setup
Coffee Pro Direct isn’t just an equipment provider—we’re partners in your coffee journey. From small cafés to large exporters, we tailor cupping lab solutions based on budget, usage, and space.
Here’s what sets us apart:
-
SCA-compliant tools and lab kits
-
Custom packages by request
-
Expert consultation on layout and equipment
-
Fast global shipping with tracking and support
-
Online training guides and customer service
Clients love our attention to detail, industry insight, and commitment to helping you elevate your quality control.
Maintaining Your Cupping Lab: Cleaning & Calibration
Your lab should run like a machine—smooth, precise, and clean.
Daily Cleaning Tasks
-
Wash and dry all spoons and bowls
-
Wipe down tables and kettles
-
Clean and purge grinders
Weekly Tasks
-
Descale kettles
-
Replace water filters
-
Check temperature accuracy on kettles and thermometers
Monthly Maintenance
-
Calibrate scales and thermometers
-
Check wear and tear on spoons, trays, and bowls
How Much Does a Professional Cupping Lab Setup Cost?
Prices vary depending on the scale of your operation:
-
Starter kit (basic tools): $500–$900
-
Standard lab (small roastery): $1,200–$2,000
-
Advanced lab (Q Grader/Importer): $3,000–$6,000
Coffee Pro Direct offers scalable packages so you can start small and expand as your needs grow.
Conclusion
A properly designed cupping lab setup is the foundation of coffee quality assurance. It helps you make better decisions, build better blends, train better staff, and create better coffee.
Whether you're just starting your business or scaling your roasting operation, investing in your lab is one of the smartest moves you can make. With Coffee Pro Direct, you’re not just buying equipment you’re building a system that empowers your team, impresses clients, and delivers cup after cup of perfection.
FAQs
What size space is needed for a cupping lab?
A small lab can fit in 100–200 square feet. Larger labs for training or green evaluation may require 500+ sq ft.
Can Coffee Pro Direct help me design my lab?
Yes! We offer layout consultations, custom equipment kits, and online design support for labs of all sizes.
How many cupping bowls do I need?
Start with at least 12–15. For each coffee, 5 bowls are ideal to test for consistency.
Do I need to be a Q Grader to use a cupping lab?
No, but Q Graders can help train your team and calibrate tasting skills. Anyone can learn to cup with the right tools and guidance.
Does Coffee Pro Direct offer full cupping kits?
Absolutely. We offer both pre-designed kits and custom lab packages tailored to your space, needs, and budget.